AWS Environment set up for Maker 2014

aws

As part of our Maker 2014 project we decided to utilise an AWS server Martin had signed up to. While we will probably end up using a local server on the day we thought it was a good opportunity to give AWS a test run. As well as giving us a way to share an environment while working as a distributed team, the process of setting up the AWS will server to Document the setup we require for our project. The Aim would be to later create a script that does all the installs and setups for us.

Originally posted on jonnie.io

Note: at the time of writing, this is a work in progress and I hope to keep it updated

So what do we need to install & setup?

Before we start

Lets make sure everything is update on our system using apt-get:

1
2
sudo apt-get upgrade
sudo apt-get update

Node.js Setup

What is Node.js? It is a Server-side implementation of the Javascript platform which allows repaid development of applications.This is particularly true if you are using complete Javascript stack such as MEAN(MongoDB, Express.js,Angular.js & Node.js) as development can be more consistent and be designed within the same system. This make rapid prototyping and proof of concept that much quicker.

nodejs.org

From my research online I have found that it is suggested building Node.js from source as packages in the Advanced Packaging Tool (AptGet) do not work always or are outdated at times on Ubuntu. So the first thing we need to do is install the some dependiences required for building Node.js

1
sudo apt-get install build-essential lamp-server^

Next we need to get the node packages to build, I went with v0.10.22 as I knew it was a stable release but if you wish to go for a newer version check out the Node.js dist site for the verion number of your choice

1
2
3
4
#Get Node package
wget http://nodejs.org/dist/v0.10.22/node-v0.10.22.tar.gz
#unarchive it
tar -xvzf node-v0.10.22.tar.gz

Next we need to mov the the node directory, run the configuration script, build it and then install it

1
2
3
4
5
6
7
8
#Move into directory
cd node-v0.10.22
#Run the configuration script
./configure
#Build it
make
#Install Node
sudo make install

The Configuration script just sets up what ever enviroment variables required and performs checks required to build Node for our platform

The make utility is to determine automatically which pieces of Node.js needs to be recompiled, and issues the commands to recompile them.

Node should be all set Now so lets test by checking the version

1
2
3
4
5
6
7
8
9
10
11
12
13
14
node -v
#Should output something like the following depending on the version you installed: v0.10.22
npm version
# should out put something like
# { http_parser: '1.0',
# node: '0.10.22',
# v8: '3.14.5.9',
# ares: '1.9.0-DEV',
# uv: '0.10.19',
# zlib: '1.2.3',
# modules: '11',
# openssl: '1.0.1e',
# npm: '1.3.14' }

Mongodb Setup

MongoDB is an open-source document database, and the leading NoSQL database. Among its features it includes JSON-style documents with dynamic schemas which offer simplicity and power. This is especially useful with node since we are already working with Javascript, and in a prototyping and rapid development environment it means we don’t have to get hung up on our models and can change them on the fly.

We will use .deb packages to install MongoDB. While Ubuntu includes its own MongoDB packages, the official MongoDB packages are generally more up-to-date.
So the first thing we need to do is add the MongoDB public GPG Key

1
sudo apt-key adv --keyserver hkp://keyserver.ubuntu.com:80 --recv 7F0CEB10

Create the /etc/apt/sources.list.d/mongodb.list list file using the following command:

1
echo 'deb http://downloads-distro.mongodb.org/repo/ubuntu-upstart dist 10gen' | sudo tee /etc/apt/sources.list.d/mongodb.list

Now we need to reload local package database

1
sudo apt-get update

Install mongoDB

1
sudo apt-get install mongodb-org

Create /data/db which is where our schemas will be stored (this may require sudo)

1
mkdir /data/db

Make sure you change the premissions of this folder so that you do not require sudo, I did this by giving my username and a specific group access

1
sudo chown -R username.groupname /data/db

Finally you can start running MongoDB with the command mongod Or sudo /etc/init.d/mongod start.
Again I recommend changing the permissions so that sudo is not required.

Coming soon…..

I will follow thing up with a tutorial on creating a minimal starting point for a Node Restful service which we will eventually use to communicate with our arduino, intel galileo and Raspberry Pi (I Will also follow up on getting a similar setup installed on a Pi)

Sources

Hacking Weekend (1)

Plan

Day 1

  • Make circuits
  • Write Arduino code
    • nRF working
    • readings
  • Hook up camera to Pi
  • Setup laptop as server

Day 2

  • Design of look - wireframing
  • Chat about logo
  • Finish arduino stuff
  • OpenCV
  • Web app

AFTERMATH

Day 1

  • Circuit making was postponed as we couldn’t locate the sensors, hopefully we’ll get to it on Day 2.
  • Arduino code writiten:
    • We have a network of 3 Arduino nodes tested talking to each other 🙂
    • Same as for point one above 🙂 Couldn’t get the sensors so we’ll hopefully get to it on Day 2.
    • A endeavour into getting the Ethernet was also made.
  • The raspberry camera was setup and tested, with the installation of the environment to make use of the python library underway.
  • A laptop setup with base xubuntu with added ssh and apache2 packages is ready for setting up the rest of the server.

Day 2

  • Mick and John made it along for day two so it was nearly all hands on deck (Greg was at the Paris Maker Faire)
  • The first item on the list was a discussion about our Github
    • We’ve decided to break the whole project into separate repositories for each discrete module
    • We can then import each repository into the Dublin Maker repository as submodules
  • Code for Arduino was improved to add profiles for the different types of sensor/devices
    • this is still getting tidied up and then will go into the Github
    • Victor got cracking on the research for the power strip power measurement
  • Colin made some more headway with the Pi camera
  • John set up our AWS server with node and web stuff so that we can use it as our backend
  • Mick did a really nice sketch-up for the web frontend

maker2014_mockupv1_doorClosed

Project Planning

Every Tuesday for the last few months we have been meeting up to have a quick scrum meeting. A “School Night Scrum”, you could say. We use this for keeping on top of what we’re all up to and to plan out our future projects. After getting our notification of acceptance, today’s session dealt entirely with our Dublin Maker project. Exciting and busy times ahead!

First on tonight’s agenda was planning a hacking day for kick-starting work on our project. There are a few of us involved in the Dublin Maker preparations so we started by making up a quick doodle to get a date that suits us all.

After that we proceeded to flesh out each of the project components a bit more in Github. We’ve setup a repository for all our code and design files for Dublin Maker and described each aspect of the project as issues in this repository:

Break down issues into tasks, using the nested task list feature

Finally we started talking about topics we’d like to write posts for this website on over the next couple of weeks. The website needs a good overhaul but even getting it up to date would make a huge difference.

  • Martin - Python Threading and Queueing
  • Victor - Open Source Continuous Integration(CI)
  • The rest need to get the thinking caps on

That’s it for tonight. More updates to follow.

Dublin Maker Prep


Hello gentle viewer,


Apologies for the brief sabbatical, I’m sure you’ve all been eagerly checking the website every day and been bitterly disappointed. Thankfully your days of sitting in with a glass of pinot noir on a lonely friday evening wearing away the lettering of your F5 key are over, we are back!


We had our first meeting for the Dublin Maker event in July and I must say we are very excited. Last year we showed some of our homebrew solutions to… residential automation using various sensor and microcontroller bits and bobs.

Maker13

Weren’t we lovely!

Anywho so we don’t want to give everything away but we have a plan. It is displayed here in stunning pictorial form:

unnamed

We’ve broken down the tasks into the following:


Smart Powerstrip - smart power strip that lets us control our devices over the web and see how much power they’re using, cool eh. Victor “I love databases” Muia and Martin “current is cool” Kennedy will be plugging away at this.


Wireless Sensors - extending our sensor bits using low power wireless and have them talk to a Galileo which will act as a gateway for the home automation system. Martin “ZigBee is for wimps” Kennedy and Greg “I work for Intel now” Jackson will be having a go at that.


Rasp Pi cam - Looking at doing image/face detection using a Pi and Pi camera, could stream to android phone and be used for security or to dynamically adjust the feel of a house to the users mood. Colin “I’m just happy to be here” Greene will be selfie-ing himself for the sake of science for the foreseeable future.


Finally we will have a server that will manage the data and make the different parts of the system talk to each other and a web app with whopper user experience to let people use all this kit in an intuitive way. John “AngularJawS” Maguire and Michael “Just Keano” Keane will be knocking this one out of the park.


So that’s us. Stay tuned people, same bed time same bed channel!

School Night Session #5 - WITH PITH 3

As you can see we’ve gotten the thing working and not only that but the current draw of the system has been optimized hugely too. The photo shows a current draw of 4.3uA for when the chip is asleep. This climbs to 5mA when the system wakes up for 4ms at a time. This means that off a single 2.6Ah 3.7V battery we should get about 308 days of battery life out of the thing (if sleeping for 60ms at a time). I am basing the 60ms sleep period on some rough calculations which you can see here (60ms asleep and 4ms awake):

WITH_PITH-HowLong
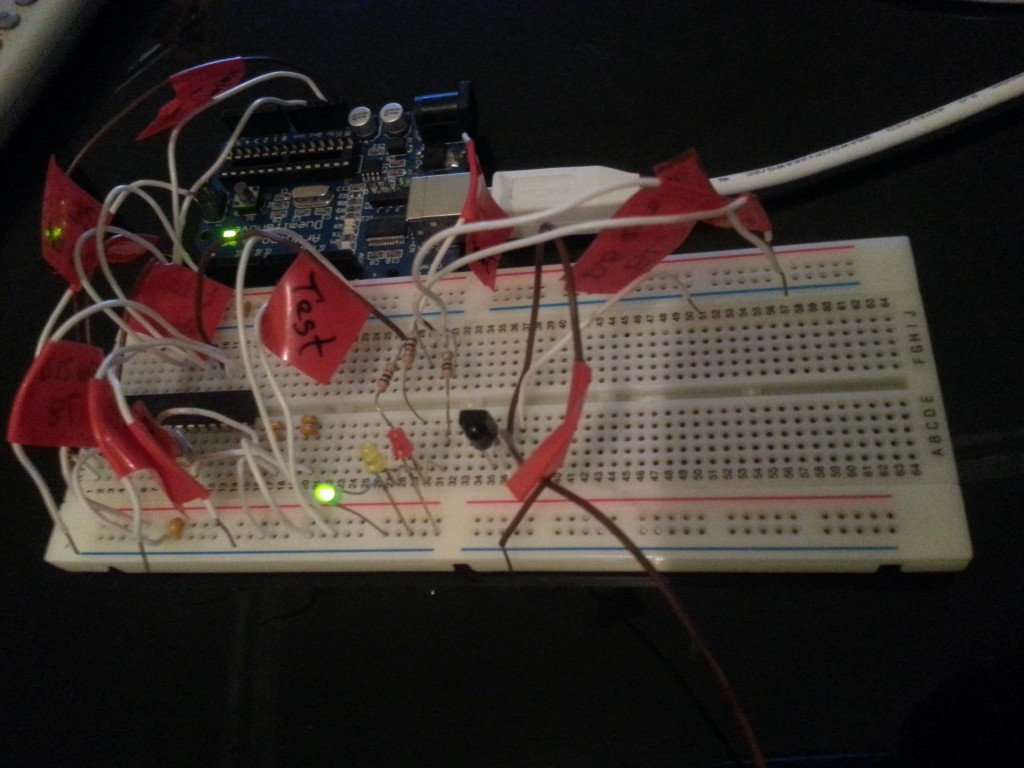
I’ve popped the Arduino code up on github too, if people want to have a look at it. It is very rough at the moment but will be tidied up and made more compact in the near future:
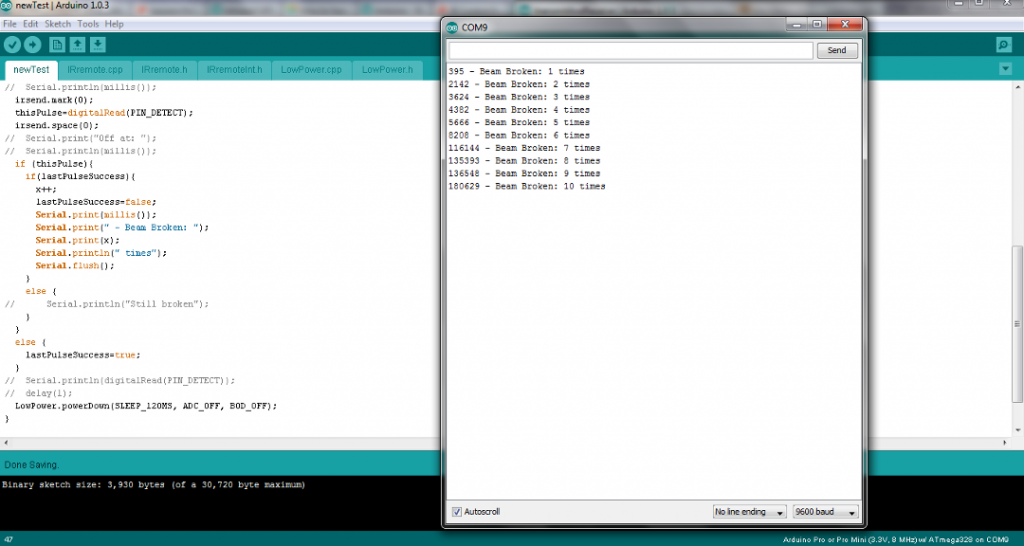
 https://github.com/thebedroomlaboratory/WITHPITH I have used two libraries in writing this code, Ken Shirriff’s Low Power Library. We were using the IR library to send a 38kHz pulse burst but the commands had additional overhead in the region of 30ms each for sending marks and spaces. This was unacceptable for our purposes here, so we migrated the library code into the sketch and changed how/when the delayMicroseconds() function was used. The Low Power Library is used for putting the 328p to sleep and setting a watchdog timer for waking it up 60ms later.

In order to reduce the current draw of the system even more, we are now powering the TSOP28238 directly from a digital pin on the 328p, just for the duration required to check the IR beam. Additionally, we have moved from using an external 8MHz crystal to using the 8MHz internal oscillator on the 328p and removed the pullup resistor on the reset pin too. There are a few resources that were invaluable for when we were trying to optimize the current draw:

We are currently waiting on screens to arrive from dx.com but then will go ahead with the full build of the system. More on that again. Maybe the same time next week 😉

It's Alive

School Night Session #4 - WITH PITH 2

We’ve begun the second run at the WITH PITH people counter. We’ve been learning how to bootload arduinos for the last hour, the following tutorial was really helpful! See the main photo above.

http://arduino.cc/en/Tutorial/ArduinoToBreadboard

We have two bootloaded ATMEGA 328p’s to test with now. Martin is working on getting the low power modes to respectable levels to that the device will run for a long time off the battery and Greg is working on making the IR receiver throw an interrupt when it receives a signal…

Update 22:54

Martins been playing with watchdog timers and we think we could get it down to 6uA in sleep mode, seriously low power.

Greg built a basic EE101 style analogue circuit to start seeing current consumption.

We started with this circuit:

Capture

Which in real life looks like this:

20130313_230246 (Medium)

So the bit on the left is the infrared LED and the bit on the right is the phototransistor. Putting your hand in the middle and breaking the beam would be just like someone walking through a door. This induces a voltage change on the line marked output. We played with the passives and got the 360uA… A good start for a proof of concept!

Update 23:51

So we’ve been operating under the assumption that we would have two power units with two power supplies and two sets of timing. Using the millis() function was the only was to count between pulses to see if consecutive beam pulses had been blocked in this system.This went at odds with our need for low power and our hope for a 6-9 month lifetime! So playing around with different options we went back to the one unit idea for all the intelligence.

This was a bit of a brick wall, we started thinking about single units. We started thinking about the reflector idea where the transmitter and receiver were on the same unit facing out and there was a mirror directly opposite. We didn’t like this though, the power needed to reach the opposite end and back would be double the original way and also we couldn’t be sure that at these power levels it wouldn’t reflect back from the person walking past the door and not be counted as a beam break.

Then we started thinking about speakers. In particular their wires. Then we started thinking about windscreens and realised we had gone off topic. But then we started thinking about speakers again and decided we would just wire the transmitter around the frame of the door using speaker wire. This idea made martin do his happy dance:

20130313_230546 (Medium)

Its such a blurry dance!

So we got going making a very long wire, which looked something like this:

20130313_231651 (Medium)

We made about 8ft of wire, for testing over distance. We found that using 1kOhm resister in series with the IR led was enough to be detected by the receiver. This is good as it consumes less power.

We’re taking the bits of code and putting something together to test this now, our time is up (its 00:33 here and its a school night!!!) so we’ll document code and put up schematics on Github tomorrow. Don’t want to get you overly excited but the system seems to be working a treat 🙂

Desk Design

I’ve been looking for a new desk for a while, moving around a lot tends to leave you with tiny desks that can be moved from apartment to apartment. I couldn’t find anything that wasn’t crazy expensive so I thought I’d just build one myself. I had a couple of design features I wanted to include:

  • Area to integrate my PC

  • Storage for laptop

  • Large area for working + PC screen etc…

  • Some sort of whiteboard

  • Lamp with magnifier

I saw a couple of cool desk designs I wanted to work around:

Whiteboard-Desk

I can’t remember where I saw this but if anyone knows please let me know and I’ll link it!

I really like the idea that you can write directly onto your desk, you can do lovely doodles for projects directly onto your writing surface. There’s a nice kind of reversion thing going on there, turning the youthful rebellion of defacing school material into a useful tool really appeals to me!

The second one I saw was from this blog:

They do a good guide for putting it together too.

Here is what I ended up with:

IMG_20120717_225109

It turned out pretty well I think, there’s a couple of more thing I want to do with it:

  • I want to add the whiteboard material, I’ve a few options for this that I want to test

  • Varnish the wood, its nice at the minute (has that lovely wood smell) but its going to stain with use

Finally once the whiteboard material is in I’ve an idea I want to get up and running. I want to attach a webcam to the lamp, then I can take photos of the lists, diagrams and such and store them to the PC. I’ll probably need a script of some sort on the computer to take a photo and store it.

Will update soon peeps with more photos and the whiteboard bits!

Printrbot Jr

After much research and deliberation I took the plunge and got a 3d printer. For those of you who wouldn’t be familiar with 3d printing, think of it like your desktop printer… Only in 3 dimensions. It uses a heated nozzle to put layers of plastic on top of each other to make a 3D shape.

Everyone has been in this situation, you want to have a shot of tequila but every dish in the house is dirty.

A genuine problem, now with a easy solution… Just 3D print a new one.

For me I think a 3D printer is a very powerful thing. As a designer I think that for iterative design to be realised you need the tools to do so. For me, the ability to draw a design in CAD, print it out in 3D and then look and feel and test it. This lets me see any potential issues and then quickly update the design to improve upon a previous version!

There’s another ecological side to it too, being able to print small parts that tend to break on household devices allows you to use devices that you might otherwise throw out for longer!

It also creates a decentralised manufacturing system whereby goods are generated at source with no transport costs. This point only really holds true if you are sourcing your plastic at source also (such as the filabot project that can take in plastics from things like milk containers).

Anyway, I would be quite passionate about this idea as you can see gentle reader. Plus I thought I would learn a lot by building one. But which one you may ask? This article on engadget was very helpful:

http://www.engadget.com/2013/01/29/3d-printer-guide/

When I ordered the Printrbot Jr, there was a slight hiccup in ordering to Ireland but Brook and David over at Printrbot were very friendly and helpful and it is now on its way! Will write up my build when it comes in… Cant wait!!!

Update 22/02/2013

0v_JQiSUWaI_5f2RElkOd50Qv4qMflf1tLY_kr1NZbc

Its here! Just arrived, can’t wait to put it together. (Work might take umbrage to me physically running from the building in the middle of the day). Going to make its assembly part of the deconstruction event. The plan is to assemble as the project goes on and then use it to print an enclosure for whatever we create!

Update 28/02/2013 - 09/03/2013

Decided to start putting it together during the deconstruction event. The box opening was very exciting! The kit is very well put packaged up and the online instructions (found here: http://printrbot.dozuki.com/Guide/Printrbot+Jr.+Kit+Build/25/1) it looks to be very easy to put together!.

2013-03-09 17.54.44 (Medium)

Unboxing… Look at all those pieces!!!The assembly went smoothly. I got as far as the frame build but I stopped building it to focus on the decon event itself. I finally got back to it on 08/03.

I won’t go into the details of the build, the instruction guide has everything you need to build it. My general view on the kit is that it is very solid, compact and has come clever features to allow the vast majority to be made from a laser cutter!

Going to calibrate the software and start printing as soon as I can. Will update with pics of the prints as they come out.

Update 10/03/2013

The Printrbot is awesome, so I got the following software (all open source of course!) to get started:

  • Serial firmware for the PC (You only really need these as a pointer to existing serials)

  • Pronterface (This allows you to manually move the steppers to calibrate the machine and end stops)

  • Slic3r (This is really cool, turns .stl files (drawings from CAD) into gcode (instructions for the printer)

This guide from Printrbot HQ was very helpful:

http://printrbot.com/wp-content/uploads/2012/04/Printrbot-Getting-Started-Guide2.pdf

I got about half way through it before the power supply started giving me issues, it would pulse on the led on the brick part of the device and the printer would turn off (or at least disconnect from the computer). I read up on the power supply and apparently it does give issues…

On this I did see a lot of people get annoyed with the part not working and being unreliable. For me, the kit is VERY good value, so heading onto ebay will get me a replacement very easily! Being in Ireland, the cost of delivery, plus duty and tax would make getting a replacement off printrbot inconvenient. Finally the guys over in printrbot were very helpful in getting me the kit in the first place!

Once the new supply is in I’ll post an update with the first prints… Can’t wait!

School Night Session #3 - WITH PITH

Tonight we are going to design a people counter for entering and exiting rooms.

We’re going to call it the WITH PITH (Who’s in the House, People in the House)

We’re going to go for an IR transmitter receiver pair where it counts a person every time the beam is interrupted.

We’re going to aim for the following features:

  • Battery Powered

  • Two units, a transmitter and a receiver pair

  • Screen to display the number of people coming into the room

  • Buttons to reset the counter and turning off and on the screen

As we go we’re going to have to revisit this list, as we want it to be battery powered it will need to be ultra low power, so certain features may get “sidelined”… or dumped really!

Martin will start designing the transmitter and Greg will work on the receiver.

Will keep you updated.

Read More

The Deconstruction - A testimonial

The Team

Capture2

The guys (Greg, Martin, John, Colin and John from left to right) put together a quick summary of what they did and how they found the event.

Greg

About Me

** Oh hi there, that’s me on the left in the jaunty hat. I’m an engineer in a renewable energy company in Ireland. I’m one half of the bedroom laboratory (www.thebedroomlaboratory.com) which is a new site which is all about design and electronic design for the open source world.

What I Did

** I mostly worked on the arduino sensor side, I got the light and temperature sensor up and running and hold the record for most things broken over the weekend (Xbee and 3310 screen to say the least). As has been mentioned previously I took the “de” in deconstruction a little too seriously.

How did I find the Event

** I just want to say personally I think the deconstruction.org carried out an excellent idea perfectly and I’ll be first in line to take part in the competition this time next year! For me this was all about learning, it was my first time working on most elements of this projects and what more could you want really??? I also got to chat to the presenters about what we’re doing, which was great fun (4G is for 4 Guinness in Ireland, I’ve totally stolen that joke!)

Martin

About Me

** I’m Martin and I’m a Ph.D. student in Dublin City University (DCU). My areas of interest are in energy-aware mobile device optimization, wireless multimedia streaming and embedded device electronic projects. Outside of the work arena, I love music and play a couple of instruments. In order to get more involved in hobby electronics, Greg and I set up the Bedroom Laboratory in the last couple of weeks and we were immediately hooked on the idea of competing in this event.


What I Did
I worked on a variety of different aspects of the project. I mucked in with some of the other lads to set up the Raspberry Pi boards as web and database servers. I also set up the Github directory for our project, which is online and downloadable at http://github.com/thebedroomlaboratory/thedeconstruction. I then moved on to trying to figure out the ZigBee communication between an Arduino and the Raspberry Pi but unfortunately, just when Greg and I got it sorted out, one of the XBee chips decided to fry. I then concentrated on getting data into the RPi from the Arduino, and wrote the code for reading sensor data from the Arduino over a USB connection. I also helped John Maguire with setting up the GPIO circuitry for reading a button press and lighting an LED whenever we “turned on the heating”. I then wrote all the control logic for the thermostat, database management and for handling the input of a manual override switch and a manual override toggle from the web interface.


How did I find the Event
This event was absolutely brilliant because it was loads of fun (in a majorly geeky way) and gave me a chance to work on stuff I’ve never tried before. Also, it was great working with these lads and seeing my bits of work slotting in with the things the others did. The sense of satisfaction in seeing the whole project working together was amazing!


John 1

About me

** I’m John, there in the middle. I’m a software Engineer who works mainly with web development and Java, and (Unfortunately ) Oracle. I know the lads through college (started in Mechatronics with Greg and changed to Digital Media Engineering with Martin and Colin), as for John, he just followed me home one day

What I did

** I worked Colin and Martin on setting up the environments, apache, php and python

I also got interaction between the pi gpios and and led and switch to show basic input and output.

I worked with martin on the main python script by creating functions which communicated with the database tables and the GPIOs

How did I find the event

** The deconstruction is the most productive I have ever been in my life (outside of work and college which don’t count). I had loads of fun and finally learned to do more then install xbmc on my Raspberry Pi. I definitely intend to continue this with the lads and hope to make it a regular thing.

Colin

About Me

** My name is Colin, I am currently working as a computer programmer for a International Insurance Company in Ireland. I met the lads in college many moons ago, even though we have taken varying paths in life we all still share a big interest in technology and all things related.

What I did

** - Was involved in setting up Apache, MySQL and PHP running on all the Pis.

  • Worked with Martin for a bit to try get the ZigBee’s talking to each other.

  • Created a database, using phpmyadmin, and also created two new tables in it.

  • Coded the server side logic that communicated with the database to pull in data.

  • Coded the php that displayed the updated temp,humidity,light and occupancy.

How did I find the event

** Really enjoyed the event, I have found it difficult to set aside time at home to do things I promised myself I would do. This was a way to force myself into the promises I kept breaking. It was much more fun to do this project in a group as it provided some great banter throughout the weekend which kept it fun. I am going home to sleep Greg stop making me do this you Tyrant !!

John 2

About me

** Hi, My name is John. I am a multimedia designer. Greg and Martin told me about The Deconconstruction event and invited me to take part. It sounded interesting so here I am! I was not familiar with many of the areas our team worked on over the weekend, which was great because I learned a shit load!

What I did

** I worked with Greg on the Arduino. This is an area that I am hoping to get more into and I tried to use this project to learn as much as I could. I also worked on getting the web interface to display the data from the web server. I’ve also put a lot of time into planning the group video and put a lot of time into the planning of the event!

How did I find the event

** Overall, I found The Deconstruction event a great way to learn. I think the time constraint worked very well as it made us more productive and kept us on our toes.

`

So we all learned, had fun and hopefully people think we created something useful!

Thanks Deconstuction!!!