So you want to Learn to program and build projects with Arduino. Me too, and I want to help you learn from my experience, as I too am a beginner.
I could do the boring, pointless Arduino version of Hello Wold, Blink!, tutorial that most people start with, but it doesn’t involve enough as far as I am concerned ( it’s all already done for you), but go ahead if you feel its worth it. For me, I want to be able to interact with it.
So for my first Arduino project I want to press a button to turn on an LED. This involves 2 Arduino Fundamentals, reading input (the button), processing it in our program (an Arduino sketch) and output a result ( turning on or off an L.E.D.).
so without boring you, lets Jump straight in…
Components we need:
- Arduino
- Breadboard
- Wires
- LED
- Push Button
- 1 x 10k Ω Resistor
- 1 x 220 Ω
First I Followed the Tutorial in Arduino Project Handbook by setting up my circuit as in the image below:
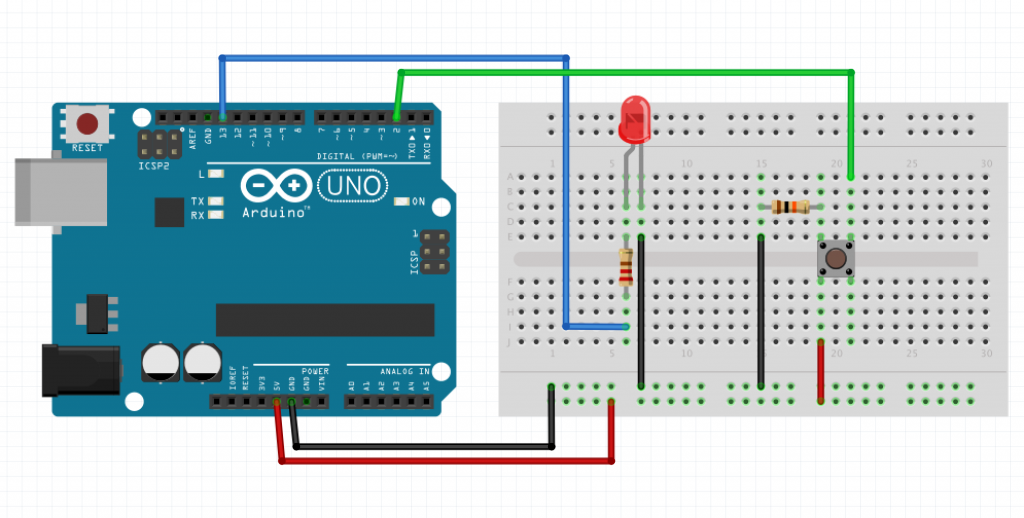
IMPORTANT: The LED legs must be in the correct direction, make sure the Negitive Leg ( the shorter leg on the side of the flat edge of the LED) is connected to the ground and the Positive Leg ( the longer leg at the side of the rounded edge of the LED) is connected to the input pin, otherwise you will likely burn out your LED.
I then started up the Adruino IDE, available here.
Inside the sketch I added the following code:
[c]
const int buttonPin = 2;
const int ledPin = 13;
int buttonState = 0;
void setup(){
pinMode(ledPin, OUTPUT);
pinMode(buttonPin, INPUT);
}
void loop(){
buttonState = digitalRead(buttonPin);
if(buttonState == HIGH){
digitalWrite(ledPin, HIGH);
} else{
digitalWrite(ledPin, LOW);
}
}
[/c]
If you need more information about what the code is doing, have a look at the Reference page, but it should be mostly obvious, I hope.
Selected the Arduino Uno the menu: Tools > Board > Arduino Uno

Then select the Arduino Port:
- For Linux/windows Tools > Board > Comx where x is usually 3 or higher
- For Mac Tools > Board > tty.usbmodemxxxx where xxxx is some number
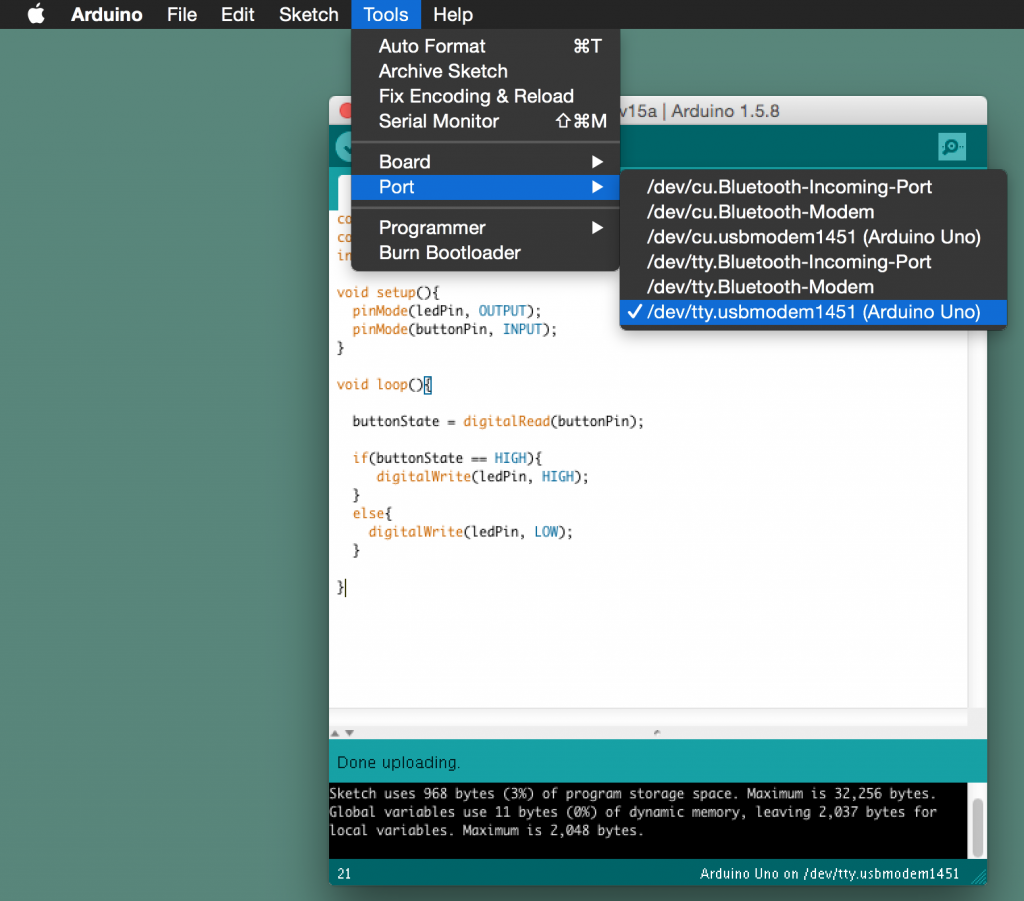
Then plug in the USB into your computer and Arduino and upload the code using the button as shown in the picture below

When the program is uploaded you are supposed to be able to press the the button which the program is continuously reading in the loop function and light the L.E.D. while the button is pressed….
BUT…… for me this was not the case, at least not completely. I found that when I put my hand anywhere near the circuit without actually touching the button the L.E.D. would still light up and sometimes the L.E.D. would just light up and stay on with out even touching the button as shown in the video below.
Frustrated yet? I was. So what to do when the instructions don’t work? Well for me usually I turn to stackoverflow for programming problems. So I had a look on the stackexchange which is the parent website of stack overflow and found an electronics subsection.
So I posted my issue, along with the steps I took myself to try and solve the problem (N.B.: if you go to any stack exchange and don’t show you made an effort, often you will be dismissed with comments like “have you even tried Googling it yourself”, So make the effort)
So here was my Question to the community
What I learned was that the reason the L.E.D was lighting when my hand was close to the circuit was due to ambient electromagnetic interference . As ‘Shubham’ explained to me
It’s because your button pin is floating (susceptible to ambient electromagnetic interference).
All the second resistor is doing is draining a little current from power to ground, when it should actually be functioning as the pull-down resistor for the button pin.To fix this issue I made the following change to the circuit:
I changed this:

To this:

And now the Circuit behaves as expected.
And there you go…a functional Arduino beginners project. I know some of you might be thinking “is it not a bit complex for simply turning on an L.E.D”. For that purpose yes, it is but imagine adding a few buttons, a few motors and a bit of work to the program, and it could turn into a basic remote controlled car. Or swap out the button for a light sensor and you could have an automated light that comes on when it gets dark. The possibilities are endless. But don’t worry, like you I’m a new to this too , so we can work on it together…
I based this post on a post I wrote for my own blog