The Deconstruction - Update 2

So we have the sensor reading temperature and light!

So what is the reason we included light you may ask o gentle reader?

I mentioned it talking to the deconstruction that heating in your home accounts for 33% of your energy use, well it turns out so does the lighting in your home. So 66% of your energy usage is tied up in these two thing, having them monitored and controlled is a good thing!

So we have our Raspberry Pi running off what we learned from our testbed.

As an aside our testbed consisted of 3 Raspberry Pi’s running over our home network so we could do all the programming we needed to from our laptops without tripping over eachother! We’ve ported all our code to the one “web enabled thermostat” and its up and running.

So what does it do?

  • Uses a sensor to measure light and temperature

  • This is sent via serial to the raspberry pi which takes it in via Python

  • The Python does all the control logic, deciding when the heating should be on and off, saving you money an keeping you warm!!!

  • We’re using the GPIO on the raspberry Pi to trigger an LED (in place of a relay for our existing thermostat)

  • Theres a boost button on the GPIO too, in case someone felt chilly and wanted to turn on their heating manually

  • then the Raspberry Pi is a web server also, allowing to see if the heating is on and what temperature/light level your home is

  • the site is mobile optimised, as checking on your phone is the easiest way to do these things!

We wanted to actually control our heating in the apartment, renting we felt playing with gas boilers may be an ever so slightly dangerous so we simulated with an LED, same difference from the outset, with the right relay (not in our box of tricks unfortunately) the logic doesn’t need to be changed. I’ll include how to do this in our documentation.

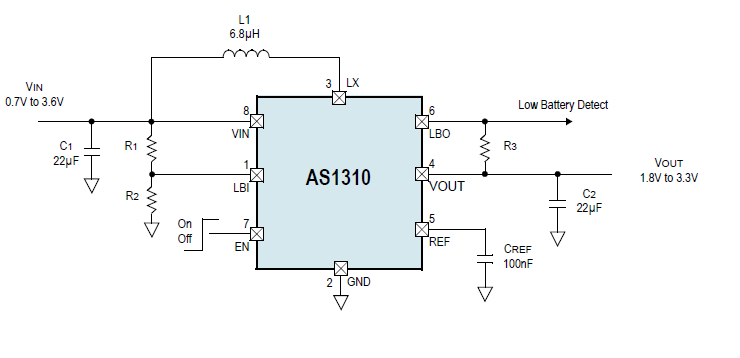
Also on the display, we had intended to do a display on the physical sensor so people could check and see in real time if they pressed the boost button. Greg, got the code working, schematic designed but managed to break the physical connector to the screen the nokia. He also set the Zigbee on fire… He is a man who has taken the word deconstruction a bit literally.

2013-02-24 19.48.22

The square on the left should be connected to the black wires. It isn’t…

What have we actually done!

It works and we’re delighted! We’ve developed a web enabled thermostat, which will be documented and released open source for everyone to use, out of our components spares box in 40 hours! Some pictures for your viewing pleasure.

Capture1

The mobile website! It displays temperature along with a picture to say what the thermostat is doing.

  • The sun means that the room is too warm and the heating is therefore turned off

  • The leaf means that you are in your ideal zone, 18-22 degrees, we chose a leaf as keeping the system in this zone saves you money and is environmentally friendly

  • there’s also a snowflake for when it is too cold and therefore the heating is turned on. (I couldn’t grab a shot of that as the room is really warm)

Here’s a pic of the sensor/webserver:

2013-02-24 20.04.15

So the top Raspberry Pi is talking to the arduino, which is doing the heavy lifting re the sensors. I won’t go into detail here as we’re going to put up documentation separately! So we’d call this project a success (and look forward to our laser cutter :) ). Seriously though, we learned a lot and had a good time. Good work team deconstruction!!!!

We’re polishing code, documenting and finishing everything off for the upload tomorrow. Had a great time and we hope people use our work to make it even better and learn themselves.

So from (left to right) Greg, Martin, John, Colin and John… Thanks for watching and keep watching the stores… eh, I mean stars.

The Deconstruction - Update 1

So we’ve started our deconstruction project, which you can check out as we go on http://thedeconstruction.org/team/thebedroomlaboratory/. There’s a live stream linked on that site and we’ll be posting regular updates there too, so it’s worth keeping an eye on.

In terms of project, we’ve decided to deconstruct the Nest thermostat into its simplest component parts and re-imagining it from scratch in an open source way. For hardware, we will be building the temperature sensors using arduino boards and building the computer for aggregating the sensor data and deciding whether or not to turn on the central heating system using a Raspberry Pi.

Last night, we turned in at 05:30. By then we had just managed to get the RPi’s up and running as web and ssh servers and devised a proper plan for tackling stuff today. We’ll hopefully be ticking things off that plan quickly as we make progress over the next few hours.

During the course of TheDeconstruction, we have also vowed to reveal a secret about someone in our team. While we are not willing to reveal the nature of the secret yet, it will be simultaneously intense and underwhelming. We are planning to include a schedule of events that will take place during our live stream, including how-to’s, off-the-cuff interviews with team members and other mystery “happenings”. The announcement of our big secret will be scheduled towards the end of the competition. So head over to our page on thedeconstruction.org and get in touch if you have any suggestions or just want to say hello.

New Shelving

One of the main issues with using a bedroom as a laboratory is that storage space tends to become slim right from the get-go. In order to fight back against encroaching components, tools and clothes, I set out today with the idea of pimping out my room with some new shelves.

aDSC02603

I live in an attic room which is shaped like a tent, thus vertical wall space for conventional shelves is just not there. On one side of the room however, I have an archway which is about 4 ft. high. It’s an awkward shape to utilize well so I thought I should build some shelves into it. The design I went with was to have two parallel slats of wood (6″ x 1″) in each shelf, supported by bricks. The nice thing about this solution is that A, I like the look of it and B, it’s non-intrusive. I can take it down whenever I end up moving out.

So off I went today to the nearest building suppliers, via public transport, armed with a backpack and a trolley that I use for carting amps around. I was full of the joys of life! Buying the timber and bricks passed without incident but when I went around to the stock yard to collect my new purchases, I realized I was out of my depth. 28 bricks weigh approx. 14 stone. 1 Martin weighs approx. 10 stone. Uh oh!

In the nicest turn of events though, while i was lumbering (pun time!) back towards the tram stop, a lovely man stopped in his car asking if I was OK. He had been getting building supplies too and saw me struggling with my lot. Long story short, he dropped me right back to the door of my apartment. A true gent! And that was not my last encounter with people going out of their way to help during this project. Later in the day a builder who was working in another house on my street gave me a lend of a hammer and chisel for splitting bricks, when mine proved insufficient for the task.

Anyway, here are some photos of the installation at various stages. Before you judge, I am not a carpenter. I know these could be mitered into the space and tidied up far nicer than they are. The shelves do open up a good bit of space in the room though, so I’m calling this project a success!


aDSC02606

aDSC02607

Lunch break

School Night Sessions 2 - Prep for Deconstruction

In advance of the upcoming competition being run by TheDeconstruction.org, we’re taking tonight’s School Night Session as an evening of preparation. The competition kicks off for real on Saturday morning at 1AM with us (5PM PST) but with shops not open at that time, we want to get a store of electronic parts etc. sorted out now. We also want to make some last minute improvements to our social media accounts and make sure this site is looking the way we want it to. If you have any suggestions for us, comment below or tweet us @bedlab. We’ll keep you posted as we go along.

Update

Finished the schedule for the weekend. Ended up not ordering the parts as we thought that working with what we have on the night when we decide a topic would be more aligned with the deconstruction theme! So we each have a box of components that we’ll try to make something fun out of!

This event has taken a lot of our time to setup so from next week we’ll resume the 3 hour designs!

The Deconstruction

We’re both looking forward to taking part in the deconstruction 2013 event. We’ve roped a few friends in to make it more fun and to have some more varied skills on the day! This is our first time doing something like this so our main goal will be to learn and meet some interesting, likeminded people. We’re not shouting from the roof top that we’ll win but hopefully we’ll have created something useful and different by the end of the 2 days. Sure who doesn’t want a laser cutter!!!

We’ll we putting updates as we go, we are currently putting together a schedule of events for the live stream of what we’ll be doing which will include:

  • How to [sessions]

  • Interview with a [nerdy engineering guy]

  • Failed world record attempts

Watch this space!

School Night Sessions 1 - The Ultra Low Power Arduino

The idea behind school night sessions is to take an idea from the back of our brain to an orderable design in 3 hours.

A deadline does funny things to people, and working to tight deadlines tends to bring out the creativity in Martin in particular!

So having started our first nights session at 9pm and having opened an eagle schematic to begin at 11.30pm, I think we can safely say that we fail this weeks task…

But hey, the website is in much better shape, we’ve set our repositories and social media who-sie-whats-its in motion and we’ve set up software we’ll be using in the coming weeks so we can easily work together. So its a start.

So expect an honest effort at a low powered arduino, along with a proper setup/design and delivery process in place that we’re going to work on over the weekend.

Stay tuned… And stay classy.

Update Midnight!

So we finished our 3 hour stint, the timer is gone and we’re fit for bed. We learned a lot about how to properly document what we’re doing an how and when to update! Will try this project again next week and hopefully be able to get it complete in the 3 hours.

Update 2 (Also Midnight)

Just on the power input, one thing we decided early on is that the system would be run from either a coin cell battery or a single AA battery. I’ve been thinking about a simple boost converter with the excellent AS1310 from austria microsystems so I thought I would try it out. Here’s the sample layout:

AS1310-300x145.png

The nice thing about this part (besides being light on passives) is that it can work down to 0.7V. This means that you can use much more of the energy contained in an AA battery without worrying about a drooping voltage over the lifetime of the battery. The goal we’ve been looking to hit is the ability to code the arduino to last for 6 months on 1AA battery.

The Hobbyist and the Golden Age of DIP Packaging

The ability to work with smt parts makes a big difference to any project or design. Unfortunately for hobbyists everywhere, the golden age of DIP packages is coming to an end. Size is cost for semiconductor manufacturers, the move to smaller and smaller processes (most visible to the outside world with Intels move to 14nm lines and beyond) leads to higher throughput and lower costs. So the chips are cheaper (purposely avoided the play on words there) but the plain fact remains that they are a pain to work with.

I think a lot of people who do electronics work come across this problem. You have a cool idea and want to try it out, if it falls outside the world of arduino shields and electronics kits in general or you are at the stage where you want to push your idea from a breadboard test to a slick single board design, lead times kill any train of thought you might have and just make it less fun!

One of the big blocks to iterative design with hardware is the ability to very quickly go through a phase of design, build, test and revise a project the way software developers can. I’ve always had a little bit of jealousy here, the compile button for a software guy is a month long supply chain exercise for a hardware guy! With the right tools in house (or bedroom in my case) this can be sped up so that momentum isn’t lost in a design iteration. I suppose it’s agile development methodologies for the hardware world.

Of course all of this only works if you keep staple components in your stores, I’ll probably go off on a tangent about this at some stage…

Reflow Soldering Oven

A goal I set myself when I decided to get into the open source, hardware design, hacking world was to build as many of my tools as I could myself. Part of this is purely for cost reasons, mainly it is due to the fact that the more of a tool or design you put together yourself the more you’ll understand how it all works! It also has the nice benefit of being able to expand on projects to add new features as they are needed.

So to this end, one of the first projects I decided to do would be to put together a reflow soldering oven. I spotted a cheap 900W toaster oven in aldi and started from there. Im putting together the full documentation for the projects section, it should hopefully make for an interesting (and more importantly) informative read